Soooo, I've been planning a church girls camp since January and it all came to a close with the big event itself mid-July. It's been really busy and a bit stressful to plan a week camp for 90+ girls and a bunch of adult staff. That hasn't left me too much time to do all the decor projects I've wanted to around the house. Still, to keep sane, I had to do a few quick projects (it's truly how I recharge.) Now that camp is over and I'm home from a 2-week family trip, I'm finally able to share a few photos of those "sanity-saving" projects.
First, I found this cute trunk/coffee table at a garage sale. I immediately saw potential. I loved the unique elephant legs. I bought it for all of $15 because there was a fair amount of pen and marker scribbles on the top. Well, no problem. I pulled out my trusy palm sander and in about 5 minutes I had a nice clean surface. I applied two coats of Minwax Jacobean and a few coats of wipe-on poly.
Isn't it cute? Sadly, it was just to small for the scale of my room. I listed it on craigslist and it sold quickly for a nice little profit.
For my next project, I found this cute little table sitting out with someone's trash on a neighboring town's large-item trash day.
Sorry for the blurry picture, but you're really not missing much. Someone had mod podged a poorly-colored backgammon and scrabble boards on the top. I first tried a little goo-gone, but that was taking too long. So I pulled out the big guns and used our big belt sander. It tore that paper right off and I took off all the existing finish. I intentionally used the front of the sander to gouge the wood to get a "hand-scraped" look. I then went over the whole top with my palm sander to smooth out the wood again. I put one coat of dark walnut stain on.
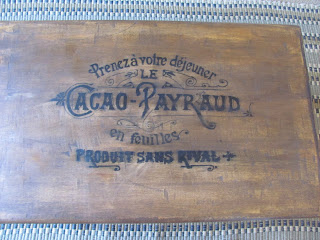
I had seen this idea for using a free graphic label from graphicsfairy on the top. I loved the idea and knew I could recreate it using my old carbon paper method I used back on my Subway signs here. I found the label I wanted and took it to Kinko's to have it blown up to a large size, costing only about $3.
I taped on the enlargement and slid under carbon paper as I traced the whole thing. That left me with faint lines to fill in using a black paint pen. After it dried, I sanded it with sand paper and roughed it up. I then applied another very light coat of stain and followed up with a few coats of poly. And here it is:
I freshened up the bottom part with some Heirloom White Spray paint. I love how it turned out and it sure helped with de-stressing me. I've realized that I really enjoy re-finishing furniture. I love taking something ugly or out-of-date and bringing it back to life!
I'll be back soon with some more projects that I've recently completed and am about to start my first furniture make-over with Chalk Paint (can I tell you how excited I am to try this?!)
Have fun!
Subscribe to:
Post Comments (Atom)


Um....I love it!!! You're amazing! This is Lindsay Olsen...just in case you didn't know! ;-)
ReplyDeleteErin, you ALWAYS amaze me!! I'm glad you're back from your trip!
ReplyDeleteI love how your coffee table turned out and I can't wait to see your chalk paint project!
ReplyDeleteI'm so glad I found you today! I was actually searching for Fall Decor and I came up with a post you did back in 2010, I am definitely following and can't wait to see what you come up with this year!
ReplyDelete