Every now and then, I'm going to share some pictures and projects from the internet that I've found inspiring. Just browsing decorator photos can give you so many ideas! Often, when I encounter a decorating problem, I google some key words and then click on the "image" tab. Often I find a solution or a way around the problem.
Here are some great ideas of unique, inexpensive and DIY ideas for decorating those big walls.
How easy this would be to do on your computer, with pre-cut scrapbooking letters, or paint?! This would look cute in a nursery or child's room.
This lady just filled a frame with old postcards to create a fun art collage.
(photo from wordpress)
This is a fun idea. Take a large map and cut it into smaller pieces and frame. It can often be cheaper to find smaller 16x20 or 11x14 frames than one, large custom frame.
Frame pages from an old book or calendar pages. You can find these old art books online at prices that are almost giving them away! Also, there are many free and inexpensive graphic sites online that you can download and print yourself. I love this idea of enlarging a vintage envelope at Kinkos and framing or mod podge-ing it to a wood backing:
(photo from Martha Stewart)
Isn't that fun? I'm going to try one of a vintage French certificate (like seen in the Ballard Design catalog.)
(photo from Ballard Design)
I love groupings of nature prints. This could be done cheaply by going to a site like http://graphicsfairy.blogspot.com/ and print out your favorites to frame. Oh, how I wish I had more walls! It'd be fun to have a grouping like this and switch it our for the seasons. Watch for unique frames at Goodwill and garage sales to keep the cost down.
Here's a take on the botanical grouping but done with real branches and leaves. I love the simplicity of it paired with the two frame colors.
Try grouping your similar framed pictures in unusal patterns as well.
I LOVE how this looks with all these rectangular frames.
(photo from Pottery Barn)
Mix in unexpected and 3-dimensional objects for even more interest. How about that vintage swimming suit? Such a fun addition to the wall.
This very creative lady did her own version of that display in a small nook. Awesome!
(photo from Pottery Barn)
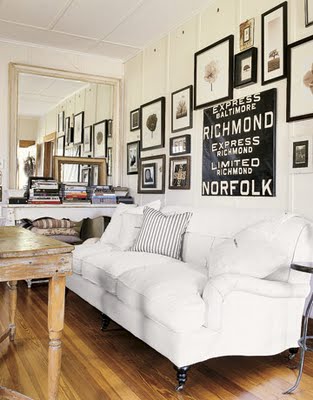
This is a fun grouping of inexpensive clocks, but it's the cities written below them that makes this arrangement so much fun for a den or international-style room.
What little girl wouldn't love these framed doll outfits?
Look how fun these painted ceiling medallions look!
Here's a darling vintage card table hung as wall art!
Make your own wood scroll art work. A rubber doormat was set on a piece (or pieces) of wood, then paint was sprayed over the mat, to transfer the design. Very creative!
I know everyone is using letters in decorating, but I love this 3-D arrangement.
(photo from Lisman Studios)
I would love to do something like this in a basement rec room. Did you see the "O" and the "W"? So cute it makes me want to pinch someone's cheeks!!!
Have some basic art skills? Try what this gal did and paint a simple tree trunk and branches on an inexpensive art canvas. Then cut out leaves from glossy magazines for a fun collection of colors!
(photo by homemade diva)
No art skills? No worries, there's a thing called "wall vinyl"!! I like how this was applied to fabric covered boards (or canvas) so that it is "framed" and is also movable. Vinyl can be ordered from a bazillion different websites or maybe you are lucky to have a friend with a vinyl-cutting machine.
Don't forget to look for architectural elements to hang as large-scale art.
Try putting a mirror in an unexpected place, like as a headboard! LOVE this idea!
Hanging Your Arrangement
Sorry for the lousy picture, but hopefully you can get the idea. Trace your frames/objects onto craft paper. Tape to the wall, moving them around until you get the arrangement you like. Hang the nails/hooks right on the paper for correct placement. Then just pull off the paper and hang up the frame!
This lady went for a random and all-over gallery look in her split-level foyer. The prints are drawings from an art book! Sometimes you just don't want such a formal and even arrangement. (By the way, this home renovation is amazing to see. Check out her blog!)
(photo by classicly amber)
When all else fails, look how wonderful just frames look!
So there you have it- my first Internet Inspiration Day. Hope you were inspired. Heck, I want to run right now and rearrange a wall in my own house!!!
A Few More for Jennie-
(domino)
LOVE the painted tree behind these photos! Would be great for a Family history photo wall.
(Decor)
Mixed media, frames within frames, similar tones.
(BHG)
(Jimenez)
(pottery barn)
(pottery barn)
Pottery barn always have great arrangements! I love the stacking of the frames as well as the big, wide mats!