Wednesday, April 13, 2011

DIY Padded Headboard

Okay, I'll say it for you: "Bad, Blogger,bad!"  I have all these posts I'd like to do and life has eaten me alive lately.  Finally, I'm getting around to posting about how I made my daughter's headboard for her Asian-themed room.  I know there are tons of tutorials out there, but I figured I might as well add mine to the mix. (You can see more shots of her room at our basement post.)


Step 1: I made a pattern for the headboard out of some old wallpaper.  I figured out the size I wanted, folded it in half.
 Step 2: I wanted a curve at each corner, so I found the perfect size lid and used it to trace my curve.
Step 3: Lay your pattern on both your wood backing and your wood frame pieces. Cut all the pieces with a handy-dandy hand jigsaw (also known as a "sabre saw.")
The reason I did the wood framework around the edges, was to enable me to put my nailhead trim on later.  If you weren't using nailhead trim, you could skip this step. I applied some woodglue to each piece of trim before screwing it to the frame.  If you were to want a tufted look, this is when you would drill holes in the desired locations on the backing.  Later, you'd be able to run a needle through these holes to add your buttons for the tufts.
Step 4: Cut to fit your foam to the center's shape.  Glue down with spray adhesive. Hint: if you have an electric knife, it is so much easier to cut foam with. I don't have one, so it was a pain with scissors.
Step 5: Lay your fabric, right side down, on the floor.  Lay your batting also on fabric. Place your wood piece also right side down on top of the fabric and batting.
Step 6: Starting on one side, in the center of the side, staple down a few inches.  Then go to the opposite side in the center also, and gently stretch the fabric and batting.  Staple down.  Then work your way towards the corner, moving from one side to the other, remembering to stretch.  Stop before actually doing the corners.  Then follow the same method with the two remaining sides.

Step 7: For the curved corners, clip the fabric along the curve every few inches with scissors. Then, staple down, gently pulling tight as you do.

Step 8:  Flip the headboard over.  Now comes the fun part.  Using a tape measure as you go, figure out how far from the edge you want your nailhead trim.  I choose to buy the kind that comes in a strip, where you only have to nail in every few spaces.  In other words, there will be a couple "fake" nail heads, then a gap for you to nail in a real nail.  I found the best price on these on ebay. It was trickier than it looks to keep it straight as you went around the perimeter, so just be careful.


Step 9: Ask you toddler to jump up and down on it to check it's soundness.  Just kidding!  That was his way of "helping."


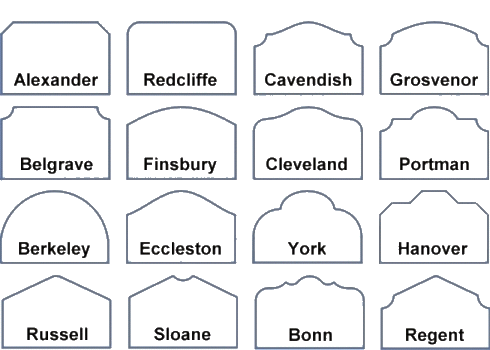
There are so many shapes and sizes you could do with an upholstered headboard. 
If you're having a hard time picturing how it would look, just google "upholstered headboards" and loads of pictures will come up.  Find the one that captures your attention and copy that style.  To buy a headboard it can cost a pretty penny. Don't!  It's really not that hard to make one.  It takes very little wood, few tools and a minimal amount of fabric.  Since it does take so little fabric, splurge a bit to get a luscious, richly textured fabric to give it that high-end look.

This week I'm linking to:

Tuesday, February 22, 2011

Internet Inspirations II

With the hard, cold winter comes lots of nasty sickness.  Around here it's really slowed down what I've been able to get done lately.  Until I can finish up a few projects to share, I thought I'd share a few fun, beautiful and clever ideas I've seen around the internet recently.

(apartment therapy)

I love this foyer entrance. It's very small, yet they made the most of this space.  The small, demi-lune shelf is mounted on the wall to not take up precious floor space.  It provides a quick place to drop the keys and the mirror visually opens up the tight space. 

(shannon berrey)
While I love all the colors and patterns in this child's room, it's the darling pillows that caught my eye.  Wouldn't it be fun to have your daughters faces on her pillows (or your daughter and her friends?)  With all the computer programs and such out there, you wouldn't necessarily have to hire an artist.  Sooo cute! And did you see those monogram shades? LOVE!

(via apartment therapy)

I just love to look and dream about this one.  If I had a blank wall in my kitchen, I'd do this china cabinet in a heartbeat!!!  What a statement piece and it gives the kitchen such a custom look.  See those kitchen cabinets in the corner of the picture?  They look to be really standard cabinets, probably painted over.  Instead of new cabinets, they probably splurged their budget on those gorgeous marble(?) countertops and repainted a china cabinet.   Love it!!!


(full house)
Need a statement piece that's fun?  This gal took a quality camera and photographed a dollar bill (first circling "in God we trust" with a red marker first.)  She then had it enlarged as big as she could through a photo shop.   Do you ever look closely at our bills?  They're actually quite lovely works of art.  Enlarging them just accentuates them.  Fun idea!

(hgtv)
Okay, so gallery walls are really big right now.  So are flat screens.  Why not marry the two and hide the black hole inside a gallery display?  Why should that tv monstrousity dominate your room?  Find a nice buffet table to set below to ground the space (and hide any electronics.)  Much better, huh?

(graham and green)
Wouldn't this be gorgeous in a nursery or young child's room?  You could buy it for almost $500 or you could sooooo make this!  I've seen such cute and realistic birds at Hobby Lobby for next to nothing. I'd either strip down an old lampshade to it's metal frame or grab some mesh wiring at Home Depot and make one around a standard light kit.  Anyone want to try it with me? :)
(Holly Mathis)
While this chair makeover is just stunning, it's the Ballerina-style ties on the cushions that are brilliant!  I'd love to make a chair like this for my daughter's desk in her bedroom.  Oh, garage sale season, can't you get here any faster?!


(Ingle Nook Decor)

Another darling idea for a girl's room!  Silhouette's are still hot right now and you could easily replicate this look. Cut your headboard shape out of MDF or plywood, prime and paint (this gal used chalkboard paint so she could write on it as well) and then apply a silhouette of your child (there are tons of tutorials of how to do a photo silhouette on your computer-no art skills necessary! Believe me, I've even done it!) Hey, Julianna- I could soo see this for your girls, huh?


(Traditional Home)
What I love about this room is the ceiling.  We often need color in our rooms but are afraid to do the whole room.  Why not just do the ceiling?  It's a cheap fix and adds interest without the cost of adding architectural interest.  I'd take those oversized framed maps on the wall, too!

(via Cote de Texas)
I've never liked mirrored closets until I saw these.  What I love is the use of antiqued mirror panels.  It really lessons the harshness of pure mirror and creates instead a vintage, architectural feel to the room.  You still get to visually enlarge the space, but with style!  While buying antiqued mirror would cost a small fortune, you can do it yourself!  I've seen quite a few tutorials of how to do it. I would love to try this sometime.


(young house love)
Do you see that tall, floor length mirror?  Expensive?  NO!  These creative people used a discarded mirrored door and framed it out with wood from a old, weathered pallet. This left it very stable and sturdy. People are getting rid of both of these for FREE all the time on craigslist! Save your money on an expensive mirror and make one of these.  I just love the vintage feel of it.


(sit relax read)
I love this homework desk built by this clever couple.  They wanted to create a place for their kids to do homework other than the kitchen table.  They reused old cabinets and beefed them up with molding and shelves.  They built the table from scratch.  It looks so good, yet really takes up very little space.  I've seen people do something similar by literally cutting a table in half like below:

(hello lovely inc)


(bhg)
I thought this idea was a very clever way to work a tv into a room that is very open and doesn't have enough wall space to waste on a tv.  It still allows traffic flow and keeps it open, yet defines the sitting area from the dining. I wish I could see what the other side is like; perhaps you could hang a lovely piece of artwork or maybe I would widen it a touch for a narrow bookshelf on that side.  Great idea and wouldn't be too hard to build yourself.


I hope you were as inspired by these as I was.  Everytime I look at these I get all geared up to make every single on of these.... Have fun!


Friday, January 21, 2011

Scrapbook Paper as Art

Have you ever gone to a specialty scrapbook store just to drool over the lovely papers found there?  I sure have.  I'm not a scrapbooker but when I see those artistic papers I can't help but try to figure out where I can use them.  A friend just asked for some ideas of what to do with her inherited stash of gorgeous paper, so here are some ideas. 

A while back I showed you a project I helped a friend with:
She had a huge wall that needed something big, yet didn't cost too much.  We found a Ginormous frame at a garage sale, painted out the background, and then mod podged scrapbook paper she had selected.

Here are a whole bunch of other ideas I've found using scrapbook paper:


(dollarstorecraftsjr)

(jcaroline)

(moneysavingmom)


 You can find square frames at places like IKEA, dollar stores, and Kirklands.  Or skip the frames and just mount the paper on wood squares or foam.

(casacullen)
I like how this gal found these pre-matted $5.99 frames at Michael's, added the paper and grouped them together to make a bigger impact.

(BHG)
I love breaking out of the mold of the square frame and placing the paper in chunky mats.  Very artsy!


(BHG)
While these are framed fabric, this unique arrangements would work well with paper.

I personally like mixing in family photos like in the arrangement on the left (sorry for the cruddy quality.)


(lifecraftsandwhatever)
We've seen all these tile mosaic art pieces in Restoration Hardware and Pottery Barn. You could make one easily.  But the cost of the tile and the weight would be crazy.  This lady made hers from paint sample chips and you could do the same with scrapbook paper. See how she did it here.  I like the metallic glaze she did over the top of it.


(remodelholic)
Here's another version of the mosaic. See her tutorial here.


(AndThen...)
This whole playroom wall was covered in scrapbook paper!  Perhaps a bit bold, but you get the idea.


These paper butterfly specimen art go from simple to very detailed.  You can just use a butterfly-shaped paper cutter or print out butterfly shapes from online and use delicated scissors to cut out varied shapes out of your paper.  I don't know about you, but I'm going to start snatching up shadow boxes and deep frames at goodwill!


I LOVE these ones!  While the shapes are all the same, they made each butterfly out of 3 layers.  So pretty!


These are basically the same idea as the butterflies, instead, fold your scrapbook paper into origami cranes, flowers or whatever shape you want.

(curbly)
These paper chains were made from scrapbook paper, shaped in to squares and framed for a unique piece of art.

(hollydollydoodar)

This creative art was made with textured wallpaper as the background and the flower pieced together from scrapbook paper.  Lovely, huh? Reminds me of a quilt.


(wheelerthree)

These would be easy to do using a piece of plywood or mdf, paint a background, a branch and then make your blossoms out of scrapbook paper (look for tutorials of flowers online-they're everywhere!)

From very simple to very artistic.  Hope you found some ideas to decorate using such a gorgeous and inexpensive resource.


Related Posts with Thumbnails