Wednesday, May 19, 2010

Carry-along play mat


This is not a home decor post. But, if you make one of these babies, you'll have your kids occupied so that you CAN do a decorating project! I first fell in love with this Michael Miller fabric called "Merryville".

 It has since been discontinued (waaanh.) If you can find any- buy it.  I thought it would make a great play mat for taking to church, the doctors, on the plane and so forth. I've had those big car road rugs before, but they were always just too big. This play mat is just the right size. Being the thrifty gal that I am, I figured of how to make these with the smallest amount of fabric possible, yet still be fun (the car fabric can be pricey.)  These have been a great gift for Birthdays and Christmas! This little mat measures appox. 16"h x 24"w and is stored in a cute little drawstring bag (with plenty of room for those cars!)


Since the Michael Miller Fabric is hard to find, here are some other versions I've been making using fabric that IS still available (I got most of mine online at http://www.fatquartershop.com/):

This one is "Wheels" by My Mind's Eye for Riley Blake Designs


This adorable city-like road fabric is from "Timeless Treasures"-Multi Main street.


This fabric is from "Timeless Treasures"-Green cars.


Let's not forget our girls. This adorable fabric is from Michael Miller called "Lil' Kingdom."  Just add a few princess dolls, a pony or two and she's off. I suspect it's being discontinued as well, so grab it while you can.  If anyone comes across a fabric that would be suitable for a girl's playmat, PLEASE let me know!!

 Alright, here's how to make these.  They really aren't that hard and go together really quickly.

Instructions:
1. Cut your car fabric and back fabric to 16" high. You will then cut the fabrics in half to make two tops, one back, and one bag.  So you need twice as much back fabric as road fabric.  I hope that makes sense. (If you have 3 yards of car road fabric, you should get 14 mats out of it and would need 6 yards of backing fabric for the backs and bags.)

2.Cut some felt to the size of the road mat.   This will go between the two fabrics to give it some weight. (If you would like, you can add an extra layer of clear plastic to the top to make it "wipeable." I left it off for expense.)
3.Sew all the way around the three layers, about 1/2" from the edge.

4.Use pinking shears to trim the edge and prevent fraying.


5.Take the extra back piece of fabric and fold it right sides together. Sew down the long side and then one short side. Pinking Shear the edge.

6. Sew the corners at the bottom to make a nice pleated bottom to the bag.

7. Fold the top edge down 1 inch. Fold again. Sew along folded edge to make a casing.

8.At the seam in the casing, backstitch a few times towards the top. Now unpick the seam.  This allows you to thread the ribbon through the casing.
9.Attach a safety pin to your ribbon, thread through opening in seam and then knot.  Add some fray check to the ends of the ribbon.

10.Fold the mat in thirds and then in half to fit into the bag. Throw in a few cars and you're ready to roll!


I made these for about $5 each. Look for clearance fabric for the backs/bags and clearance felt to lower your cost. 

Okay, they're busy now! Go paint that dresser!!!


This week I'm participating in:

Wednesday, May 12, 2010

My Take on Drop-cloth Drapes

But Mom, everyone else is doing it!  Yup, some genius out there in blogland figured out that painter's drop cloths are a thrifty way to have a huge yardage of fabric at hand to make curtains, drapes, slipcovers and other home decor items out of.  It comes in many different dimensions from a few yards worth, all the way up to 15 foot lengths for those two-story windows that are so expensive to cover.  It has great texture and flecks to it's oatmeal color, giving an impression of linen, but at such an affordable price.

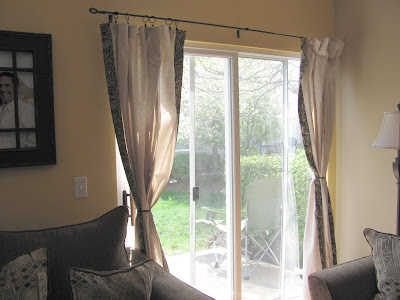
I helped my friend, Jill, make some drapes for her apartment.  Not wanting to spend a lot for a temporary home, yet needing to cover the slider and adjoining window, drop cloth was a perfect solution.


We added a nice paisley fabirc band to the edges and bottom to dress it up a bit. It looks really pretty against her yellow wall.  We also pleated the top to give it some fullness. When we took this picture we didn't have enough clips to keep the sections between the pleats from "flopping".


A few hints about using drop cloths.  Try to buy at one store as there are differences in quality and colors.  I got mine at Home Depot.  I washed the fabric 3 times with loads of liquid fabric softener to get it nice and supple and to remove the faint odor to it.  You can also bleach the fabric it you want.  If you're using a large drop cloth, you may consider cutting it into smaller panels to fit better in your washer.


Internet Inspirations:

(The Lettered Cottage)
Probably the one that started it all. Simple shape held up by black clips.  Love the layered look by adding the bamboo shade.


(homebodyholly.blogspot)
Love the valance's band of fabric and cute hooks made from teacup hooks.

Trim the curtains and pillows with a cute cordinating fabric for a custom look.


I love how these look against a colored wall.  It softens the frames of the windows.

Add a band of fabric 2/3 of the way down.
(smittendesign.blogspot)
Look at this darling ruffled edge and europen pleats at the top!  Subtle but custom-looking effect.


(charishumin.blogspot.com)
A darling ruffle to the bottom of a chair's slipcover.


(coastal nest.blogspot)
Nice slipcover made out of drop cloth.

This whole room was slipcovered to give it a lighter look and freshen up the outdated furniture.


(creativelittledaisy.blogspot)
Classic pleated slipcover from a drop cloth.

(homebodyholly.blogspot)
Great recover of dining chairs.  I love the nail head trim on the backs.


(shanty2chic.blogspot)
There's the ruffle again paired with a vintage number on the seat.


(missmustardseed.blogspot)
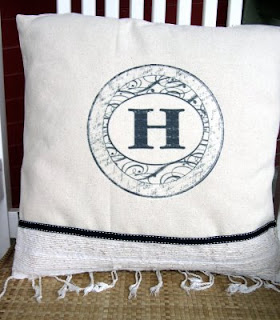
This gal replicated the "grain sack" look by painting initials and a stripe on the drop cloth before slipcovering the ottoman.
(bethcrabtreehunter.blogspot)
This lady used iron-on paper for your printer to get these designs on her pillows.  Add trim and you have a great Ballard design-inspired pillow.

Hope you were inspired to use drop cloths in your decorating. So what are you going to make with drop cloth?!

Friday, May 7, 2010

Re-dye of a Free Leather Chair


     Have you ever in your excitement totally forgotten to do something that was critical to the project in the first place?  Well, I did it.  I was so excited to try my first attempt at re-dying leather that I forgot the most important thing for this posting- the BEFORE picture!  Arghh. I was so gun-ho and excited that I spaced out.  I found this lovely Barkelounger leather recliner next to someone's trash on "large item disposal day." In general I don't like recliners, but this one had nice, classic lines, gorgeous rolled arms, nail head trim and leather going for it. I had just that morning seen someone on blogland post about  their re-dye of a chair.  I pulled off the road, backed up, jumped out, looked the chair over, even stuck my nose to it to see if it smelled like leather and didn't smell like anything else!  I found that all the mechanics were in perfect shape and so loaded her up ( I trully have no shame anymore at grabbing from people's trash! Sorry, Mom, you tried to raise me right.)
       A few bruises later, I had her home.  I cleaned her up with some Ivory soap and let it dry.  In the meantime, I researched!
I found a leather supply store (one of the biggest) not 20 minutes from my home!!! I hauled in the cushion and asked the nice guy there to verify that 1. it was leather and 2. that I could re-dye it and 3.his recommendations of how to do it. I learned that you have to be sure that your furniture is indeed leather or aniline leather (different types of dyes would be used depending on which leather you have.)

This is what I did:

While this is not my couch, this is what it looked like before (no kidding):

and this:

See those faded spots, cracked areas and bum and head-faded spots?  That's what this chair had.
I cleaned it with a soft rag and warm water and dove soap.  I got all the cracks and edges free of dust.
I didn't use a leather cleaner, but next time I would try this to see if I can get more of the darkened areas out (presumably from people's hair resting against the cushions.)
I then chose to use a very thin dye from Fiebingers called "chocolate."
I bought a 32 oz bottle and only used half of it, doing almost 3 coats! I believe it was only $8 for that bottle.
If I'd had a compressor spray gun, I would have applied the dye with that. Since I didn't, I used this handy little product:

Basically it's just an aerosal-type can that you place your dye in the jar and attach it to the Preval spry applicator.  Then all you have to do is lightly spray!  I had to be sure to get in the grooves and wrinkles of the chair.  BE SURE to wear thick plastic gloves or you'll be stained for a long time!  I forgot about my toes peeking through my sandals and had a very weird faux tan look for a week! I found I occaisionally got a run of dye that I tried to wipe up quickly with a rag. I used the rag to apply a bit of dye in the wrinkles where the spray wasn't getting.
I went over the chair almost three times to use up the whole can of Preval.  I was so worried it might not do the whole chair, but I was fine!
Now at this stage, the chair actually looked pretty bad.  You couldn't see the fade and grease marks as well, but the leather looked so dry and uneven.  I put my faith in the process and kept my fingers crossed (and hey, the chair was free!  Worse case scenario it goes back in the trash!)
Wait a full 48 hours for the dye to absorb and dry.  I then buffed and buffed with many soft rags to get the excess dye off that didn't absorb. You really have to do this step or you might end up with dye on your clothes! Even then, he said you may not want to sit down on the chair in really light clothing for a little while until you're sure you got it all! Once my rags were coming off clean, I applied this was rejuvenator and sealant recommended by the guy at the shop:

This is where the real magic happened and this old chair was brought back to life!  I rubbed this balm generously all over the chair.  She started to shine and the tones evened out nicely. There are other sprays and finishers for really high-wear areas, but the guy at the shop said this would keep the leather more supple. He recommended putting rejuvenator on once a year to keep the hide soft. I can still see some flaws underneath and a slightly darker patch on the headrest. 

 The cushion was soo faded before but now it looks like new!


The original leather color can be seen on the little sample here under the cushion:
In person, the leather is really a deep maroon color now. I guess "chocolate dye" plus the original orange-y color yeilded this deep maroon!


  Overall, I'd say it was a successful experiment and I'd do it again!  Since I can still see the area on the headrest, next time I'd spend a little more on a product to de-grease the leather first and I bet that it'd look closer to new.
It's funny, in person you really don't see the dark area on the headrest so clearly as in the photo. The leather has a lot of shadows naturally so it doesn't show as much. I still wish I'd tried a degreaser first. I may still go and get some dye in black and go over it again.  Who knows?
 I might even get a stain sprayer for our air compressor if I attempt a couch.  Overall I spent a bit under $30 (with dye and rejuvinator left over) for a very nice leather chair for the basement and a few days of fun trying something new! A chair was saved from the dumps and given a new chance at life!  Love it!
Related Posts with Thumbnails