Monday, August 29, 2011

Search Craigslist Faster!!!

I've been using this awesome way of searching craigslist for a while now and realized that I hadn't shared it on here.  If you use craigslist to find used items and hate how long it can take to weed through all the garbage listed on there, have I got a way to help!

It's a bookmarklet called Craigseasy.  What it does is let you search craigslist in just pictures.  Then you can quickly scan down the list and see what is good and find what you want SOOO much faster.  I used to spend 30 mins to an hour opening and closing listings looking for what I wanted.  Now the same search will only take me under 5 mins!

Here's what you do.  Go to Craigseasy. Follow the easy instructions to download the bookmarklet.


It takes less than a minute to do this.  You add craigseasy to your favorites up in your tool bar.  Then, go to craigslist like usual.  Put in your search parameters, like "couch", click "furniture by owner", and click the "has image" box (be sure to do this step!)  Then hit "search."  You'll see your usual search list in text.  Now, for the magic... Go up to "Favorites" and click on your new "craigseasy" button.  In a few seconds, up will come you search for "couches" but in pictures!


Now you can just scroll down the search results and see what's out there.  If something looks interesting and you want to read more details about it, just click on it's title and the listing details will come up.

I can't tell you how much time this has saved me and enabled me to get some great deals off craigslist by only spending a few minutes a day.  Go! Get this Bookmarklet now!


Thursday, August 18, 2011

My First Chalk Paint Project

Have you ever been so excited about how a project is turning out that you show it off before it's even all the way done?  No?  Well, I am going to.  I have been DYING to try out the amazing chalk paint all summer.  My wonderful friend, Amber, of Shades of Amber (click on this link to order), has recently become Colorado's only stockist of Annie Sloan Chalk Paint.  She was kind enough to send me a quart for me to try.
 I heard all the rave reviews about this last winter and have been wanting to try it ever since.  It may seem a bit expensive at $36.95 a quart- but believe me, it's worth it.  It's a beautiful, thick, creamy texture and spreads beautifully.  The best part is that you don't have to prime, sand or strip down your furniture.  Yup, that's right, just spread the gorgeous paint right on. 

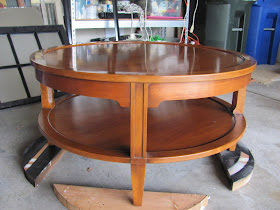
So, here's my guinea pig project. A nice, round coffee table I found cheap on craigslist.

 See that nice glossy, stained finish?  Well, it didn't last long with chalk paint.  In the past I would have had to sand it down a bunch, wipe it down, apply a couple of coats of primer and then get around to painting.  With chalk paint, it's all instant gratification (definitely my type of project.)  I used both a nice purdy-brand brush and a foam roller to apply three coats of paint.  You only need to wait about an hour between coats (see, it IS instant gratification at it's best!)

This is what she looked like with just one coat of "cream" chalk paint:


I was impressed at how thick the paint was, making very few drips or paint brush marks.  It dries very fast, though, so go light, rather than thick as you apply it.  After the three coats, I let it dry overnight.

When dry, you are left with a nice smooth, but matte surface. Here's where the fun begins.  Because of it's chalk nature, it sands away beautifully.  I sanded all the edges to give it a nice aged patina.


It does leave quite a mess of chalk dust when you sand, so do it outside (not inside, on carpet, like I did!)

  I knew right away what I wanted to do to make this table special.  Like the tables I did in my last post here, I found an old french label from The Graphics Fairy (an awesome copyright-free website of clipart) and blew it up at Kinkos.

So here is what it looks like so far.  I still need to use a couple coats of wax to seal in the paint and lettering.  The wax will harden and protect as well as give the piece a sheen (when I finish with the wax, I'll add a post script on with a picture.)


 I love how it looks now!  I'm still not sure it's the right scale for the room, but I'd sure have a hard time parting with it.  It was such a fun, quick project (probably a total of only 2 1/2 hours of work!)

So, are you sold on chalk paint yet?  Well look at all the amazing colors it comes in (and yes, you can layer or mix colors.)
Shades of Amber  (click on link to order) offers a beautiful color deck that you can buy so that you can see what you're getting before you mortgage the farm or cat or whatever to buy the paint!  Brilliant, huh?  What's even better is that they've covered one side in clear wax and the other side in the brown wax so you can really see how it changes/accentuates the color! Amber sent me a deck and it really is beautifully done.

I also recommend visiting Amber's blog to see projects done with chalk paint.  She even hosts a fun link party on Mondays so you can get further inspiration and ideas of what can be done with chalk paint. I'll be linking up my table on Monday, Amber!!!

I would also recommend visiting Miss Mustard Seed's blog posts about chalk paint and her video tutorials on wax if you're feeling a little nervous about trying this.

I still have 3/4 of a can left after painting this table, so I plan on painting a secretary desk that's in my daughter's room next!  I can't wait!!  So what are you going to try Chalk Paint on?


This week I'm linking to:

Tuesday, August 9, 2011

A Few Sanity Projects

Soooo, I've been planning a church girls camp since January and it all came to a close with the big event itself mid-July.  It's been really busy and a bit stressful to plan a week camp for 90+ girls and a bunch of adult staff.  That hasn't left me too much time to do all the decor projects I've wanted to around the house.  Still, to keep sane, I had to do a few quick projects (it's truly how I recharge.)  Now that camp is over and I'm home from a 2-week family trip, I'm finally able to share a few photos of those "sanity-saving" projects.

First, I found this cute trunk/coffee table at a garage sale.  I immediately saw potential.  I loved the unique elephant legs. I bought it for all of $15 because there was a fair amount of pen and marker scribbles on the top.  Well, no problem.  I pulled out my trusy palm sander and in about 5 minutes I had a nice clean surface. I applied two coats of Minwax Jacobean and a few coats of wipe-on poly. 


Isn't it cute?  Sadly, it was just to small for the scale of my room.  I listed it on craigslist and it sold quickly for a nice little profit.

For my next project, I found this cute little table sitting out with someone's trash on a neighboring town's large-item trash day.
Sorry for the blurry picture, but you're really not missing much.  Someone had mod podged a poorly-colored backgammon and scrabble boards on the top.  I first tried a little goo-gone, but that was taking too long.  So I pulled out the big guns and used our big belt sander.  It tore that paper right off and I took off all the existing finish. I intentionally used the front of the sander to gouge the wood to get a "hand-scraped" look. I then went over the whole top with my palm sander to smooth out the wood again. I put one coat of dark walnut stain on.
     I had seen this idea for using a free graphic label from graphicsfairy on the top.  I loved the idea and knew I could recreate it using my old carbon paper method I used back on my Subway signs here.  I found the label I wanted and took it to Kinko's to have it blown up to a large size, costing only about $3.


I taped on the enlargement and slid under carbon paper as I traced the whole thing.  That left me with faint lines to fill in using a black paint pen.  After it dried, I sanded it with sand paper and roughed it up.  I then applied another very light coat of stain and followed up with a few coats of poly.  And here it is:


I freshened up the bottom part with some Heirloom White Spray paint.  I love how it turned out and it sure helped with de-stressing me. I've realized that I really enjoy re-finishing furniture. I love taking something ugly or out-of-date and bringing it back to life!

I'll be back soon with some more projects that I've recently completed and am about to start my first furniture make-over with Chalk Paint (can I tell you how excited I am to try this?!)

Have fun!